Without writing any code you simply run the blinky project from eclipse by doing the below installation steps
Step 1: Install Nodejs
Install Nodejs
Node js can be installed using a standard EXE provided by nodejs vendor.
Download the installed and install it as usual.
The nodejs will be automatically available in PATH environment variable allowing it to be executed from any prompt.
Step 2: Check Nodejs in command prompt
C:\>node --version
v12.16.2
Step 3: Install XMP
C:\>npm install -g xpm
Step 4: Check XPM
C:\>xpm --version
0.6.4
Step 5: XPM Windows build tools
C:\blinky>xpm install --global @xpack-dev-tools/windows-build-tools@latestStep 6: XPM ARM gcc
C:\blinky>xpm install --global @xpack-dev-tools/arm-none-eabi-gcc@latestStep 7: XPM ARM QEMU
C:\blinky>xpm install --global @xpack-dev-tools/qemu-arm@latestStep 8: Add gcc to path
C:\>set PATH=%PATH%;C:\Users\<your home>\AppData\Roaming\xPacks\@xpack-dev-tools\arm-none-eabi-gcc\9.3.1-1.1.1\.content\bin

C:\>set PATH=%PATH%;C:\Users\<your home>\AppData\Roaming\xPacks\@xpack-dev-tools\arm-none-eabi-gcc\9.3.1-1.1.1\.content\arm-none-eabi\bin
Please replace <your home> to proper folder name
Step 9: Add emulator to path
C:\>set PATH=%PATH%;C:\Users\<your home>\AppData\Roaming\xPacks\@xpack-dev-tools\qemu-arm\2.8.0-9.1\.content\bin
Please replace <your home> to proper folder name
Step 10: Install Eclipse plugin
Step 11: Create C Project in eclipse

Step 12: Configure blinky ready made code project

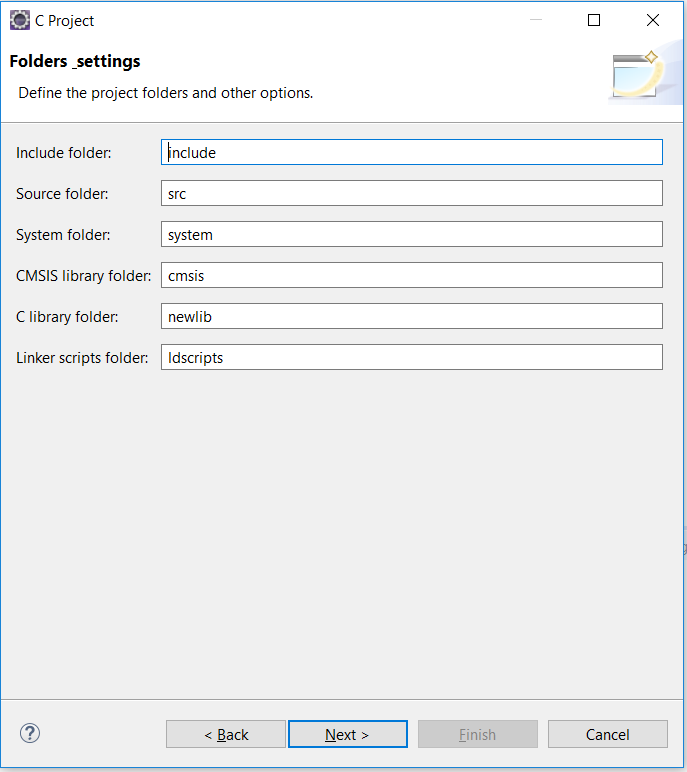
Step 12: Configure Folders
Step 13: Configure EXE

Step 14: Configure GCC

Step 15: Run the ELF
Build the project in eclipse then run the below command
qemu-system-gnuarmeclipse -board STM32F429I-Discovery -mcu STM32F429ZI -image .\Debug\blinky1.elf"blinky1.elf" is the project name, you can change it
,you will get the "Hello World!" output
main(argc=1, argv=[""]);
Hello ARM World!
Standard output message.
Standard error message.
System clock: 168000000 Hz
Second 1
Second 2
Second 3
Second 4
Second 5
Dear dickens.co.in admin, Your posts are always well-cited and reliable.