This article explains how to run STM32 embedded board in an emulator on windows
Step 1: Install Nodejs
Install Nodejs
Step 2: Check Nodejs in command prompt
C:\>node --version
v12.16.2
Step 3: Install XMP
C:\>npm install -g xpm
Step 4: Check XPM
C:\>xpm --version
0.6.4
Step 5: Install Python 2.7
Install Python 2.7
Step 6: Check python
C:\>where python
C:\Python27\python.exe

C:\>python --version
Python 2.7.14

C:\>where pip
C:\Python27\Scripts\pip.exe

C:\>pip --version
pip 20.2.1 from c:\python27\lib\site-packages\pip (python 2.7)
Step 7: Install Yotta
C:\>pip install yotta

....

.....

  Running setup.py install for wrapt ... done
  Running setup.py install for PyGithub ... done
  Running setup.py install for hgapi ... done
  Running setup.py install for pathlib ... done
  Running setup.py install for mbed-test-wrapper ... done
  Running setup.py install for pyelftools ... done
  Running setup.py install for pywinusb ... done
  Running setup.py install for intervaltree ... done
  Running setup.py install for project-generator-definitions ... done
  Running setup.py install for project-generator ... done
  Running setup.py install for valinor ... done
  Running setup.py install for ntfsutils ... done
  Running setup.py install for yotta ... done
Successfully installed .......................
Step 7: Install CMake
Get latest X86 version from https://cmake.org/files/
Example: cmake-3.2.1-win32-x86.exe
Install it to C:\CMake
Step 8: Add cmake to PATH and check
C:\>set PATH=%PATH%;c:\CMake\bin

C:\>cmake --version
cmake version 3.2.1

CMake suite maintained and supported by Kitware (kitware.com/cmake).
Step 9: Download Ninja
download install ninja
Unzip ninja-win.zip to c:\CMake\bin this path is already in PATH
Step 10: Check ninja
C:\>ninja --version
1.10.0
Step 11: Create a directory "blinky"
C:\>mkdir blinky

C:\>cd blinky

C:\blinky>
Step 12: Create Yotta Blinky Project
C:\blinky>yotta init
Enter the module name: <blinky>
Enter the initial version: <0.0.0> 1.0.0
Is this an executable (instead of a re-usable library module)? <no> yes
Short description: example 1
Author: Me
What is the license for this project (Apache-2.0, ISC, MIT etc.)?  <Apache-2.0>
Step 13: Target board STM32
C:\blinky>yotta target stm32f429i-disco-gcc
info: get versions for stm32f429i-disco-gcc
info: download stm32f429i-disco-gcc@0.0.20 from the public module registry
info: get versions for mbed-gcc
info: download mbed-gcc@1.2.2 from the public module registry
Step 14: Install Drivers
C:\blinky>yotta install mbed-drivers
info: mbed-drivers, *
info: get versions for mbed-drivers
info: download mbed-drivers@1.5.0 from the public module registry
info: dependency mbed-drivers: ^1.5.0 written to module.json
info: get versions for mbed-hal
info: download mbed-hal@1.3.0 from the public module registry
info: get versions for cmsis-core
info: download cmsis-core@1.2.0 from the public module registry
info: get versions for ualloc
info: download ualloc@1.3.0 from the public module registry
info: get versions for minar
info: download minar@1.3.0 from the public module registry
info: get versions for core-util
info: download core-util@1.8.0 from the public module registry
info: get versions for compiler-polyfill
info: download compiler-polyfill@1.3.0 from the public module registry
info: get versions for greentea-client
info: download greentea-client@1.1.0 from the public module registry
info: get versions for mbed-hal-st
info: download mbed-hal-st@1.0.0 from the public module registry
info: get versions for mbed-hal-st-stm32f4
info: download mbed-hal-st-stm32f4@1.3.5 from the public module registry
info: get versions for uvisor-lib
info: download uvisor-lib@2.1.2 from the public module registry
info: get versions for mbed-hal-st-stm32cubef4
info: download mbed-hal-st-stm32cubef4@1.2.0 from the public module registry
info: get versions for mbed-hal-st-stm32f429zi
info: download mbed-hal-st-stm32f429zi@1.1.0 from the public module registry
info: get versions for cmsis-core-st
info: download cmsis-core-st@1.0.1 from the public module registry
info: get versions for cmsis-core-stm32f4
info: download cmsis-core-stm32f4@1.2.0 from the public module registry
info: get versions for cmsis-core-stm32f429xi
info: download cmsis-core-stm32f429xi@1.0.3 from the public module registry
info: get versions for dlmalloc
info: download dlmalloc@1.1.0 from the public module registry
info: get versions for minar-platform
info: download minar-platform@1.1.0 from the public module registry
info: get versions for minar-platform-mbed
info: download minar-platform-mbed@1.3.0 from the public module registry
Step 15: XPM Windows build tools
C:\blinky>xpm install --global @xpack-dev-tools/windows-build-tools@latestStep 16: XPM ARM gcc
C:\blinky>xpm install --global @xpack-dev-tools/arm-none-eabi-gcc@latestStep 17: XPM ARM QEMU
C:\blinky>xpm install --global @xpack-dev-tools/qemu-arm@latestStep 18: Add gcc to path
C:\>set PATH=%PATH%;C:\Users\<your home>\AppData\Roaming\xPacks\@xpack-dev-tools\arm-none-eabi-gcc\9.3.1-1.1.1\.content\bin

C:\>set PATH=%PATH%;C:\Users\<your home>\AppData\Roaming\xPacks\@xpack-dev-tools\arm-none-eabi-gcc\9.3.1-1.1.1\.content\arm-none-eabi\bin
Please replace <your home> to proper folder name
Step 19: Add emulator to path
C:\>set PATH=%PATH%;C:\Users\<your home>\AppData\Roaming\xPacks\@xpack-dev-tools\qemu-arm\2.8.0-9.1\.content\bin
Please replace <your home> to proper folder name
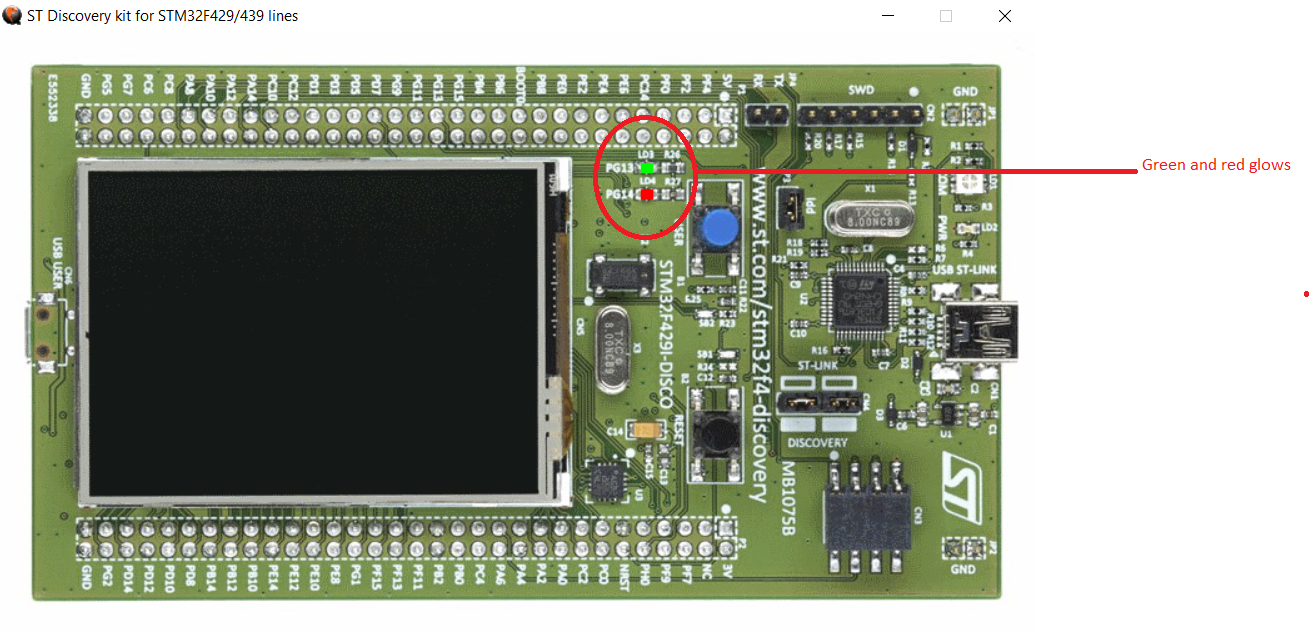
Step 20: Write your code -- C:\blinky\source\app.cpp
#include "mbed-drivers/mbed.h"

static void blinky(void) {
    static DigitalOut led1(LED1);
    static DigitalOut led2(LED2);
    led1 = 1;
    led2 = 1;
}

void app_start(int, char**) {
    while(1) {
        blinky();
    }
}
put this code as "app.cpp" inside C:\blinky\source
Step 21: Compile
C:\blinky>yotta buildStep 22: Run the code
qemu-system-gnuarmeclipse -board STM32F429I-Discovery -mcu STM32F429ZI -image .\blinky\build\stm32f429i-disco-gcc\source\blinky.bin
Output
End Of Article